
|
|
#1
|
|||
|
|||
|
Ok, so the boat is in the backyard now and the city should be happy....
 I jwanted to get a better look at the transom so I removed the aluminum around the top of the transom and this is what I found 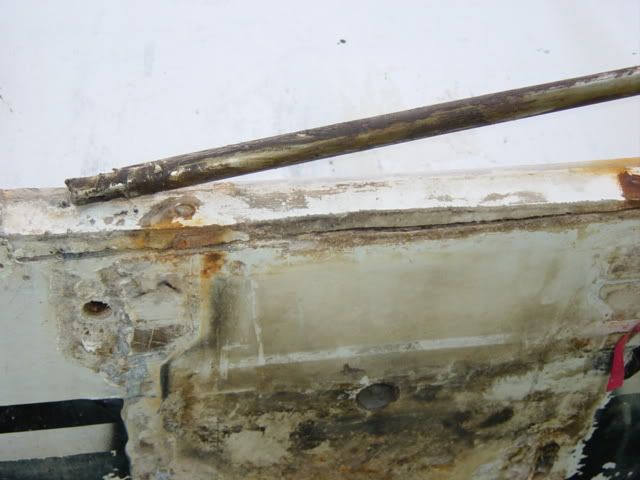 I think I see why the transom is soft, so the first order of business is to start cutting!!!! I think I'm going to try to use the Coosa board. When I get it I'll take pics and let you guys know what I think of it (bare in mind I'm a novice...at best...so there will be a lot of "Learn as I go" type stuff going on) Some of the guys on the classic mako site seem to love the stuff and I haven't heard any negitive. I hope that means I'm on the right track!!!! Now for the big question...Should I remove the whole cap or just cut it a few feet in front of the transom? The way I see it, cutting would be easier, but after looking fairly close at the boat it seems to me that I'll have to make sure to make the repair to to the cap strong since it looks like the cap adds to the over all strength of the hull (the sides seem pretty flimsy). On the other hand, removing the whole cap would be a severe pain in the @#$ (but doable....kinda :-[) Decisions Decisions...... 
|
|
#2
 06-17-2005, 09:24 AM
|
||||
|
||||
|
I think removing would be preferable to cutting . . . but I have done neither! Kudos for diving right in where others fear to tread!
|
|
#3
06-17-2005, 11:34 AM
|
||||
|
||||
|
Vic cut the sides and deck and pulled the rear section. fixed the problem, and put it back good as new. *His is slightly different (full transom w/bracket). *After seeing how his came out, if I have to go into the transom, I think I will do that.
|
|
#4
06-17-2005, 11:44 AM
|
||||
|
||||
|
Jeff, my cap needed to be re-attached so I removed the rub-rail and all poorly installed fasteners, detached bulkheads under dash, make sure nothing else attaching hull to cap, then blocks and jack under cuddy and up she went!!...support in-place w/ 2X4s, get the work done and drop it back down...no "walk in the park", but on older hulls like yours and mine, not too hard... ;)...
Oh yeah...nice gate... ;D...
__________________
'74 V-20/ BF 150 '95 V-21/ BF 150 '84 V-20/ 200 2.4 Merc '87 V-20/'18 F150 Yamaha 
|
|
#5
06-17-2005, 01:10 PM
|
|||
|
|||
|
Hey Reel (or anyone else who's been through this :) ), when you re-attached your cap, did you use just screws again, or did you go with bolts? Also, did you just lay the 2x4s across the top of the sides of the hull, or did you put blocks on the floor to support the cap while it was off?
Thanks to all for advice / encouragment
|
|
#6
06-17-2005, 10:50 PM
|
||||
|
||||
|
Jeff, I used approx 120 1 1/2" SS screws all counter-sunk to keep the surface FLAT...trick was using 1 1/2" wide x 3/4" strips of Starboard inside the top of the hull to catch all the screws...pulls the top edge of the hull to the inside edge of the cap...put all screws in, leaving gap...filled gap w/ 4 large tubes of 3M's 4200 all the way around, let cure, then snugged screws down again to get her REALLY TIGHT all the way around...had 3 drill motors going: 1st for pilot hole thru hull and Starboard, then larger bit for clearance hole thru edge of cap ONLY, then counter-sink bit to allow screws to seat...started at bow and worked to stern on each side...she's TIGHT now... ;D...
Small blocks forward around bow between hull and cap and stiff-legs under the gunwales toward the back... Do all the above then same screws to re-attach rub-rail, again start at bow and down both sides...pulled RR tight w/ ratchet straps to wall behind the boat and followed contour of cap toward the stern...hope this helps... ;) ;D... Oh yeah...disconnect fuel filler hoses before you lift...good idea, huh?... Should have taken pics, but that was before MJ taught me how to post pics... ;D...
__________________
'74 V-20/ BF 150 '95 V-21/ BF 150 '84 V-20/ 200 2.4 Merc '87 V-20/'18 F150 Yamaha
|
|
#7
06-18-2005, 11:45 AM
|
|||
|
|||
|
Thanks Reel, I'm printing off your advice now! ;D As for the fuel tanks, I'm taking them out before I get started (I'm still planning on trying to put a fuel cell under the floor, but that comes after the transom ;D ) I do have one more question (ok, one more question for now ;) ) The splash well is part of the cap but is not screwed in. Am I correct in assuming that where the gap in the photo of my transom is will be where I need to seperate the cap (splashwell portion) at the transom?
I'll post more pics as I make progress, but looks like I'm not going to have much time this weekend.... :(
|
|
#8
07-08-2005, 04:17 AM
|
||||
|
||||
|
here's a great way to repair a transom without ripping out the floor and cap. use the pour a transom . here's a link to the site with directions
http://www.transomrepair.com/mixing/mixing.html
__________________
 1978 V20 Cuddy w/ 225 Johnson. And Several other boat's
|
|
#9
07-08-2005, 07:01 PM
|
|||
|
|||
|
I've looked into the seacast, and while it seems like a good idea, I've read that seacast is heavier than the wood it's meant to replace. In all the research I did, I found more people who were happy with the coosa board than seacast. Thanks for the imput, though :)
|
 |
|
|


 Linear Mode

