
|
|
#11
|
|||
|
|||
|
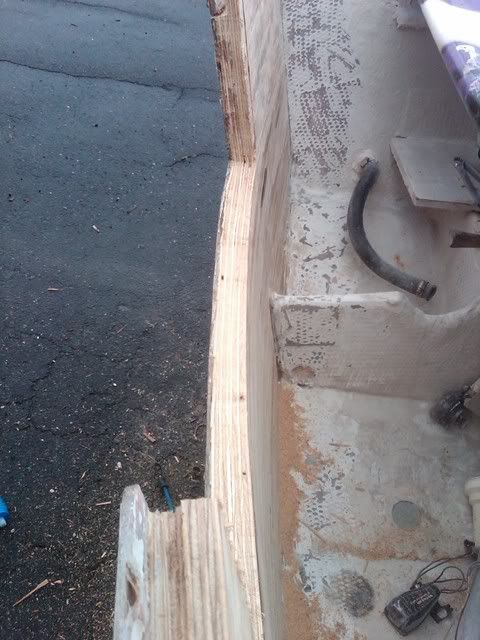
Update, 2 layers of 3/4 inch epoxyed in, will glass in today. Man that 2nd layer of 3/4 was a bear, I ended up having to use a fork lift with some weight on it and lowerd the forks on top of the wood to help push it down. also got the floor glassed in, used 40oz woven looks like what wellcraft used, it took 3 gal of resin to wet it out.

|
|
#13
 03-20-2011, 08:56 AM
|
|||
|
|||
|
What are they called and where can I get some?
Mine had brass one but I couldn't salvage them.
|
|
#14
03-20-2011, 12:17 PM
|
||||
|
||||
|
find the one that matches what you had and bed it good with 5200 or something similar
sorry couldn't get the link to work, go to west marine and type in" thru hull fittings" in the search box. Last edited by phatdaddy; 03-20-2011 at 12:20 PM. Reason: bad link
|
|
#15
03-20-2011, 08:32 PM
|
|||
|
|||
|
Finished glassing the floor and transom, had to use heaters to keep the temp up at night as it has been dropping down to the 50's
 
|
|
#16
03-20-2011, 09:49 PM
|
|||
|
|||
|
How much glass did you put on? Looks good, but a little light....you shouldn't see the wood as clearly as that...what was the original skin thickness? What type of glass did you use? Also, I would probably put a few more layers where the transom meets the stringers to tie it in a little better.....thats a key element for strength in a transom and allows transfer of load to the rest of the grid.
__________________
87 Fisherman 20 Last edited by Richie Rich; 03-20-2011 at 09:56 PM.
|
|
#17
03-21-2011, 06:34 AM
|
|||
|
|||
|
I used 38oz plain weave with 1oz chopped strand stiched to the bottom of that, it measured .040 thick with some calipers.
I know it is thick as it took 3 gal of VE to wet out the floor and 1.25 gal of epoxy resin to wet out the transom. I got the fiberglass direct from a mill here in SC that makes fiberglass products, it was for boat building, it was a 50'' wide 50' roll, I was suprised that you can see so clearly after resin was applided, the floor I used VE and the transom I used epoxy. So being so clear I guess that is just the good quality of the glass and resin from US Composites. I used epoxy putty in all the gaps and used that to glue the stringer ends to the 2nd layer of the new transom. I also used 6'' wide strips of that 38oz glass to tie the transom on the sides, bottom and around the stringer first, then covered the whole thing with one big piece of the same glass. I think this should be very strong. Let me know what you think.
|
|
#18
03-21-2011, 08:25 AM
|
|||
|
|||
|
Here is what I used the woven measure .025 thick and the chopped mat is about .012 thick
And the stiching to the woven I think adds strength. 
|
|
#19
03-21-2011, 08:45 AM
|
|||
|
|||
|
Looks like good quality material.....and you got great wet out on the tabbing and full sheet...no bubbles......but IMHO I think one or two layers isn't enough... .040 skin thickness is light.....decks are one thing, but most transoms are .125 to.250 thick, depending on the MFG'er and boat/engine combination....what was the original skin thickness you removed? You want to match and/or exceed the OEM skin thickness.
__________________
87 Fisherman 20
|
|
#20
03-21-2011, 09:30 AM
|
||||
|
||||
|
Inside transom thickness from the factory on my V was thin (One layer of heavy woven into one oz matt). They didn't throw too much at it and they didn't spend any time filling in the gaps with putty to smooth out the transitions. To me 38 oz. sounds about right with what the factory used. I don't recall them using much if any reinforcement around the perimeter where the real loading is. The outside (hull) on mine was about 1/4" to 3/8" thick. You could debate for hours on the layup schedule. What Richie Rich said, thumbs up!! I personally like to layup wet on wet if two or more layers are used. If the 1st layer is allowed to kick off and set, you then have to grind it out again to get a proper bond(at least with VE, not sure about epoxy). So you would be grinding away some of the long woven strands in order to layup a second layer and that would deminish the strength of the first layer. When wet on wet isn't possible and where weight isn't a concern I like to lay a layer of 1.5oz mat into the roving as a sacrificial layer that can be roughed up for the second or third layers of glass. My .02
IMO what you have done so far looks great. You need to spend some time on the top of the transom to ensure it is waterproof. With respect to the heavy weight fabric, it is very difficult to get it to make the tight radius where the upper edge of the plywood core meets the upper lip of the transom. You may want to get some lighter glass to reinforce the edges and push into the corners at the top sides and bottom of the transom. You have come a long way fast. Don't rush it too much, take your time and the results will be spectacular. Last edited by RidgeRunner; 03-21-2011 at 09:47 AM. Reason: Reread RichieRich post.
|
 |
| Thread Tools | |
| Display Modes | |
|
|


 Linear Mode

